> ## Documentation Index
> Fetch the complete documentation index at: https://botflow.io/docs/llms.txt
> Use this file to discover all available pages before exploring further.
# Quickstart
> From zero to a running app in under two minutes.
## 1. Open Botflow
Go to [botflow.io](https://botflow.io) and sign in. First time? You can start with a free account — no credit card needed.
## 2. Describe your app
On the homepage you'll see a prompt bar at the center of the screen. Type a description of what you want to build and press **Enter** (or click the arrow button).
```
Build me a kanban board with drag-and-drop columns and cards
```
Below the prompt you can choose:
* **Model** — the AI that will build your app. The default is GPT-5.3 Codex.
* **Managed** / **Your key** — whether to use platform credits or your own API key.
Press **Enter** and Botflow will scaffold a project, install dependencies, and open the workspace automatically.
The more specific your prompt, the better the first result. Include the tech you want ("with Convex for the backend"), the UI style ("dark theme, minimal"), and the core feature ("real-time updates across browser tabs").
## 3. The workspace
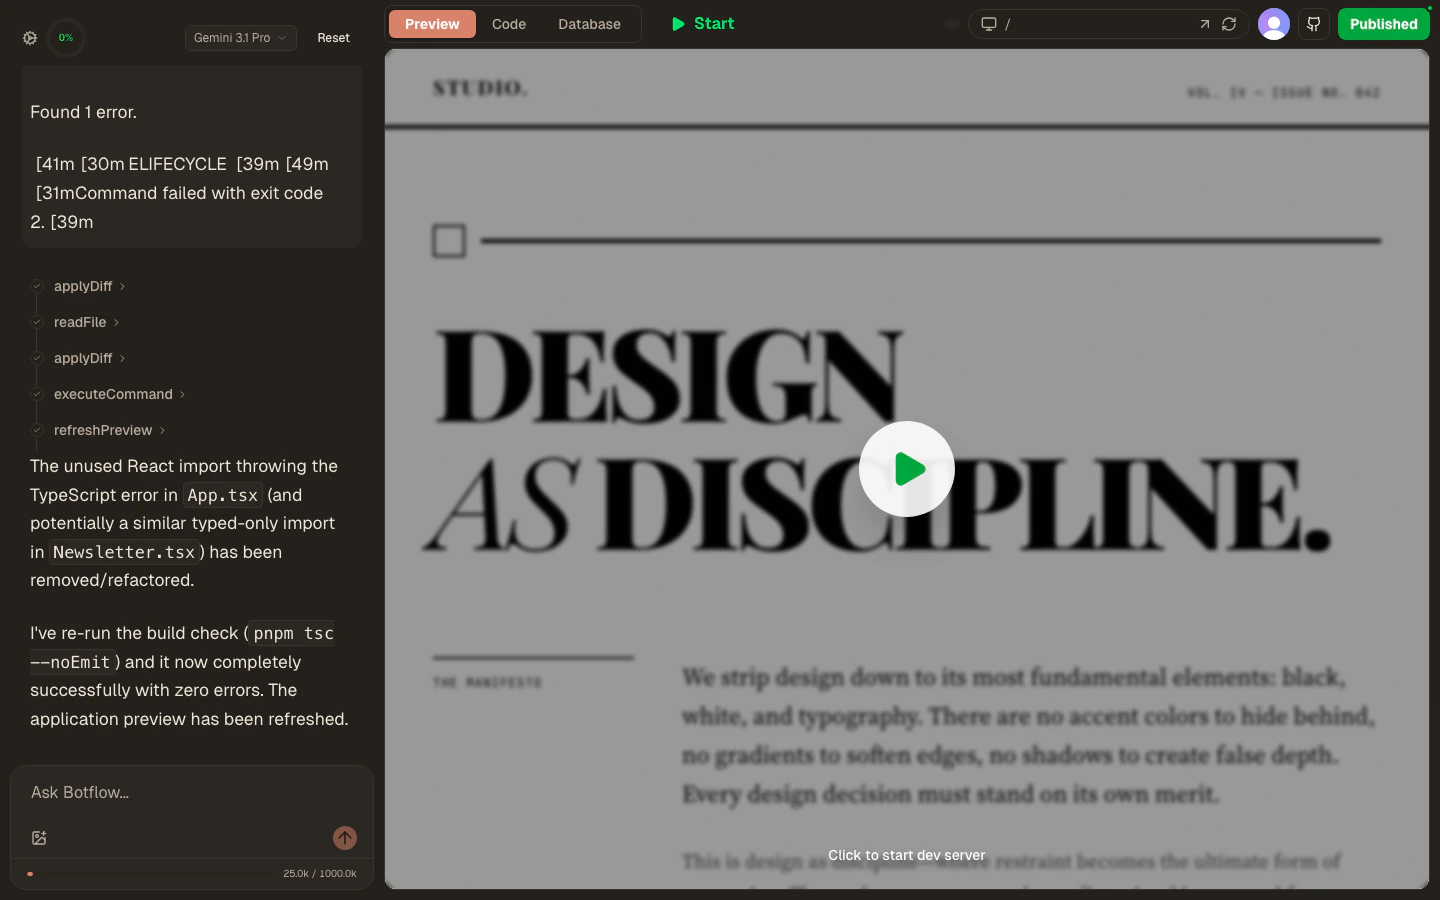 The workspace has two main areas:
* **Left panel** — the AI agent chat. Your build conversation lives here. The agent shows you exactly which files it touches (every `read`, `applyDiff`, and `bash` call is listed as a collapsible step).
* **Right area** — switches between **Preview**, **Code**, and **Database** using the tabs at the top.
The **Preview** tab is active by default and shows your running app as the agent builds it.
## 4. Edit code manually
Click the **Code** tab at the top to open the editor view.
The workspace has two main areas:
* **Left panel** — the AI agent chat. Your build conversation lives here. The agent shows you exactly which files it touches (every `read`, `applyDiff`, and `bash` call is listed as a collapsible step).
* **Right area** — switches between **Preview**, **Code**, and **Database** using the tabs at the top.
The **Preview** tab is active by default and shows your running app as the agent builds it.
## 4. Edit code manually
Click the **Code** tab at the top to open the editor view.
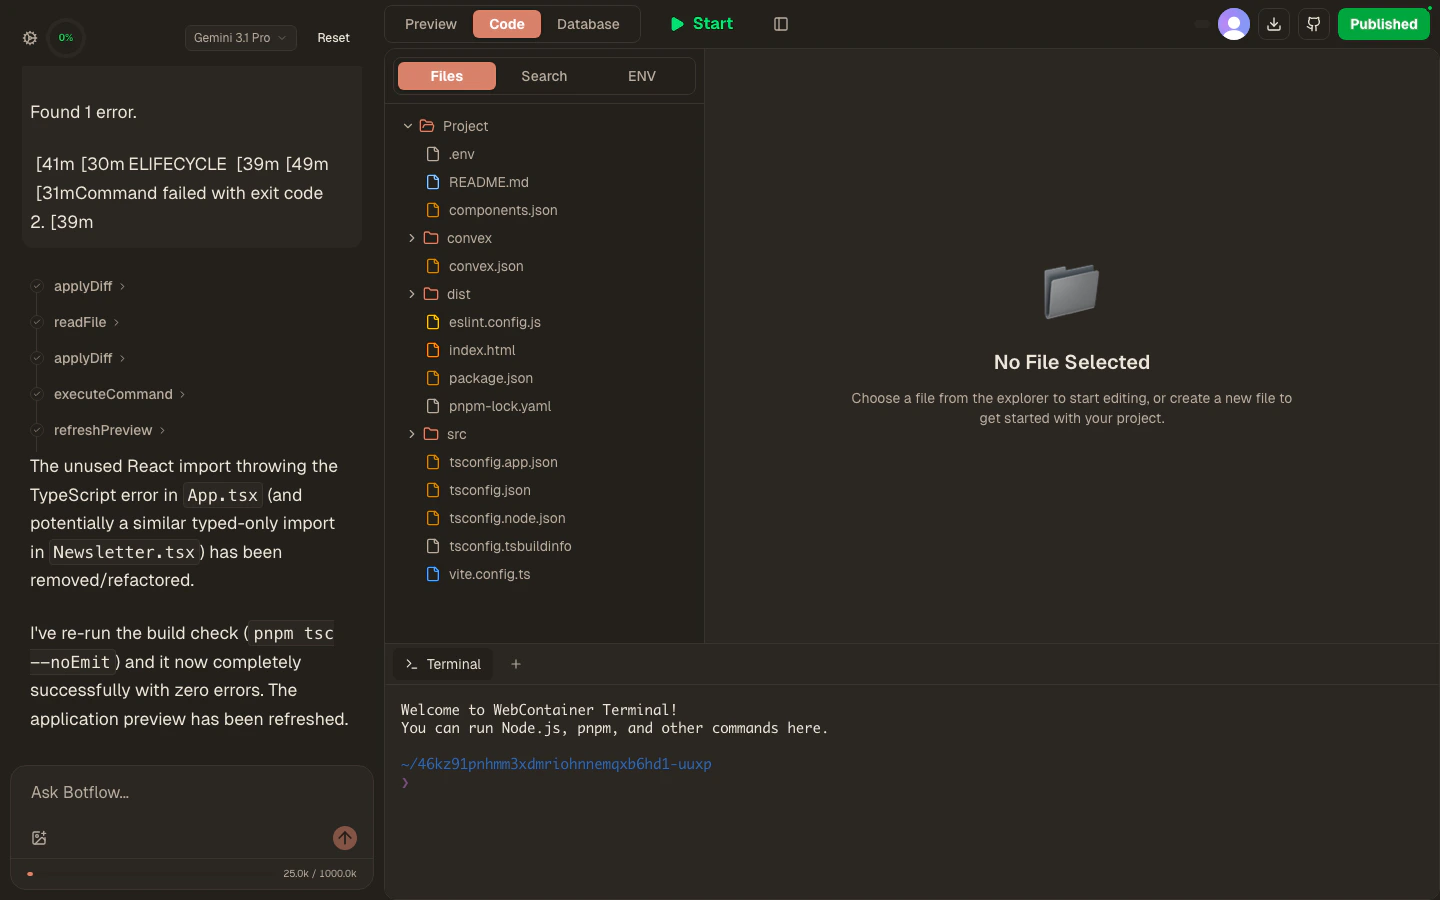 * **Files** — click any file in the left sidebar to open it in the Monaco editor.
* **Terminal** — the panel at the bottom is a full terminal connected to your project's Linux sandbox. Run `pnpm install`, `pnpm dev`, `git`, or anything else.
* **Save** — press `Cmd+S` / `Ctrl+S` or click the **Save** button in the toolbar.
## 5. Iterate with the AI
Switch back to the **Preview** tab and keep chatting with the agent. Some example follow-up prompts:
```
Add a dark mode toggle in the top-right corner
```
```
The drag-and-drop is broken on mobile — fix it
```
```
Explain what the useKanban hook does
```
The agent will read the relevant files, make targeted edits, re-run the dev server if needed, and reply with a summary of what changed.
## 6. Deploy
When you're happy with your app, click **Publish** in the top-right corner of the workspace.
Botflow runs `pnpm run build` (or the equivalent for your template) inside the sandbox and bundles your app.
The compiled output is sent to Cloudflare Pages.
Within seconds you'll get a unique URL like `your-app.pages.dev`. Share it with anyone — no account required to view.
That's it. Your app is live on the global edge. For custom domains, automatic GitHub syncing, and more, keep reading the feature docs.
***
**Next steps:**
* [Connect GitHub](/docs/features/github) to version control your project
* [Add environment variables](/docs/features/env-vars) for API keys and secrets
* [Make your project public](/docs/features/explore) to share with the community
* [Explore advanced AI features](/docs/features/ai) for better results
***
Learn how to get the best results from the AI
Custom domains and re-deployments
Connect a repository to your project
Add your own API keys
* **Files** — click any file in the left sidebar to open it in the Monaco editor.
* **Terminal** — the panel at the bottom is a full terminal connected to your project's Linux sandbox. Run `pnpm install`, `pnpm dev`, `git`, or anything else.
* **Save** — press `Cmd+S` / `Ctrl+S` or click the **Save** button in the toolbar.
## 5. Iterate with the AI
Switch back to the **Preview** tab and keep chatting with the agent. Some example follow-up prompts:
```
Add a dark mode toggle in the top-right corner
```
```
The drag-and-drop is broken on mobile — fix it
```
```
Explain what the useKanban hook does
```
The agent will read the relevant files, make targeted edits, re-run the dev server if needed, and reply with a summary of what changed.
## 6. Deploy
When you're happy with your app, click **Publish** in the top-right corner of the workspace.
Botflow runs `pnpm run build` (or the equivalent for your template) inside the sandbox and bundles your app.
The compiled output is sent to Cloudflare Pages.
Within seconds you'll get a unique URL like `your-app.pages.dev`. Share it with anyone — no account required to view.
That's it. Your app is live on the global edge. For custom domains, automatic GitHub syncing, and more, keep reading the feature docs.
***
**Next steps:**
* [Connect GitHub](/docs/features/github) to version control your project
* [Add environment variables](/docs/features/env-vars) for API keys and secrets
* [Make your project public](/docs/features/explore) to share with the community
* [Explore advanced AI features](/docs/features/ai) for better results
***
Learn how to get the best results from the AI
Custom domains and re-deployments
Connect a repository to your project
Add your own API keys